Deploy Umami Analytics using Google Cloud Run and Cloud SQL
If you are looking for a simple and privacy-friendly alternative to Google Analytics, you might want to try Umami. In this blog post, I will show you how to deploy Umami using Google Cloud Run and Cloud SQL.
What is Umami and why do I use it?
Umami is an open-source web analytics tool that lets you track and analyze your website traffic without compromising your users’ data. On the technical side, the tool is based on NextJS in combination with a MySQL or PostgreSQL database.
I personally like the very intuitive dashboard. Instead of having to click through several reports like I do with Google Analytics, I have the most important metrics all visible at a glance in Umami. Nevertheless, there is no lack of details. Sensibly hidden sub-areas contain analyses of sources and parameters, and even specially defined events can be tracked in Umami.
In addition, there is an extensive API interface. In the export area, a large part of the data can be mirrored with this in other environments.
At the same time, data can be tracked in Umami from a wide variety of environments. Although Umami outputs a ready-made tracking snippet as a Javascript, this can also be bypassed and all tracking sent directly to the endpoint via a simple POST request.
Mike Cao and his team are currently working on a cloud version of Umami, which is already available as a beta on the website. With the cloud version, you can bypass your own hosting and start very quickly. At the same time, the hosted version relies on the (at the time of this blog article slightly immature) version 2 of Umami.
Why do I use Google Cloud Run and Cloud SQL?
In this blog post, we will show you how to deploy Umami using Google Cloud Run and Cloud SQL, two serverless products from Google Cloud Platform that make it easy and cost-effective to run web applications in the cloud. My team and I already host the majority of our data infrastructure in the Google Cloud, so the idea of deploying Umami in the Google Cloud was obvious. Unfortunately, I had a harder time getting Umami to work reasonably.
Privately, I was used to using environments like Netlify or Vercel. Here, the installation is a matter of five minutes: Create the database (e.g. via Supabase), connect the Github repository, set a few environment variables and you’re done.
In the Google Cloud, unfortunately, a few more steps are necessary. Cloud Run, for example, requires a dockerised image of the application to be built. And the connection to Cloud SQL is also not very intuitive.
Setting up Cloud SQL
Within the Google Cloud universe, the easiest way to implement the database is via Cloud SQL. Here you can choose between MySQL and PostgreSQL database. The instance itself behaves similarly to a regular on-premise solution. The advantages lie on the one hand in increased security measures and on the other hand in flexible scaling of resources.
Start by creating a new Google Cloud SQL instance, for this tutorial I use a PostgreSQL database in version 14. To create it, you must now define the necessary settings for the instance.
First give the instance an ID. This is freely selectable, but it is advisable to choose a self-explanatory name (e.g. umami).
Now you have to enter a password. By default, this password is the same as for the default user of our database - but I recommend to create a new user later, so the password is less important.
The following settings are related to the later load of the database, i.e. how much data you want to process. For the time being I decided to use a lightweight configuration to keep the costs low. You can edit the instance at any time and add more memory or CPUs. Automatic upgrade of resources and automated backups are also possible.
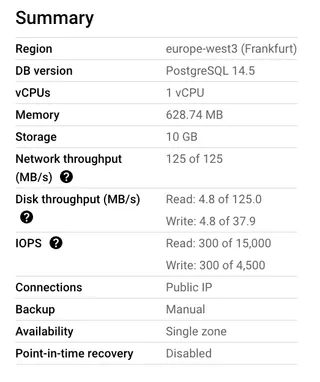
After creating the Google Cloud SQL instance, it appears in the overview. Make a note of the connection name at this point.
Under https://console.cloud.google.com/sql/instances/{INSTANCE ID}/databases, create a database and give it a name.
Lastly, create a new user with a strong password at https://console.cloud.google.com/sql/instances/{INSTANCE ID}/users.
Store Secrets in Secret Manager
For the connection to the Cloud SQL database you need a connection string for Umami, this must be passed as an environment variable.
To prevent your connection string from being accessible to every user in your Google project, you can store it in the Secret Manager and only allow selected people to view it.
To do this, go to the Secret Manager and create a new secret DATABASE_URL. Now enter the connection string. This is composed of the database user, the corresponding password and your connection name from Cloud SQL.
postgresql://{DATABASE USER}:{CORRESPONDING PASSWORD}@localhost:5432/{DATABASE NAME}?host=/cloudsql/{CLOUD SQL CONNECTION NAME}
Deploy Umami to Google Cloud Run
Cloud Run vs. App Engine
There are many different ways to host a NextJS application in the Google Cloud. The two most common are App Engine and Cloud Run.
I won’t go into too much detail here (a complete overview has been compiled by Paul Craig), for me the flexibility of resources and free quotas makes the difference. I ultimately chose Cloud Run because I can have the instance shut down to 0. So if I don’t get any page views, I don’t pay anything for using Cloud Run during that time.
Additionally, Google leaves a lot of room for free experimentation with the Free Tier:
- First 180,000 vCPU-seconds/month
- First 360,000 GiB-seconds/month
- 2 million requests/month
Copy Docker Image to Artifact Registry
Steps for Umami v1.x.x
Umami provides ready-made Docker images. However, these are hosted in GitHub packages, but Cloud Run only supports images from the Artifact Registry or the Container Registry. So, in order to deploy a Docker image to Google Cloud Run, we have to mirror the image. I’m using Artifact Registry for this.
- First, create a new repository. You can choose a single or multiple regions, I chose a single one for the Umami Docker Image.
- Now pull the current Docker image of Umami. If you don’t want to use the latest version, you can find all historical versions in GitHub packages.
docker pull docker.umami.dev/umami-software/umami:postgresql-latest - Tag the image using the Artifact Registry naming convention. If you like, you can use a specific version as tag instead of latest.
docker tag docker.umami.dev/umami-software/umami:postgresql-latest {LOCATION}-docker.pkg.dev/{GOOGLE PROJECT ID}/{REPOSITORY ID}/umami-postgresql:latest - Push the image to you repository.
docker push {LOCATION}-docker.pkg.dev/{GOOGLE PROJECT ID}/{REPOSITORY ID}/umami-postgresql:latest
Steps for Umami v2.x.x
After updating to v2 on Umami, the Docker image is provided by Umami as a multi-platform image. Unfortunately, this is not compatible with Google Cloud Run, which requires an intermediate step.
- Start with creating a new Artifact Registry Repository like vor v1.
- Clone the GitHub repository
- Create a .env-File and paste in the default
DATABASE_URL.
DATABASE_URL = "postgresql://umami:umami@db:5432/umami" - Rebuild the Docker image using dockerx and emulated amd64 platform.
docker buildx build --platform linux/amd64 -t docker.umami.dev/umami-software/umami:postgresql-latest {LOCATION}-docker.pkg.dev/{GOOGLE PROJECT ID}/{REPOSITORY ID}/umami-postgresql:latest . - Push the image to you repository.
docker push {LOCATION}-docker.pkg.dev/{GOOGLE PROJECT ID}/{REPOSITORY ID}/umami-postgresql:latest
Create Cloud Run Service
Start by switching to Cloud Run and create a new service.
Choose “Deploy one revision from an existing container image” and set the just uploaded docker image from the Artifact Registry.
Set a name for the Cloud Run service, I named mine umami-postgresql.
Choose your region.
The CPU settings depend on your intended use. My settings:
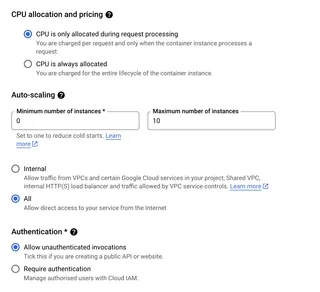
Note: Setting “Minimum number of instances” to zero means that if Cloud Run is not used (no incoming pageviews and no accesses to the dashboard), the instance will be completely shut down. This is very efficient cost-wise, but means a startup time of about 5-10 seconds on the first incoming request.
Under “Container, Networking, Security”, set Container port to 3000.
I chose to use 512 MiB Memory and 1 CPU, this also depends on your usage.
Set your Environment Variables, except for DATABASE_URL. You can find all possible variables in the documentation.
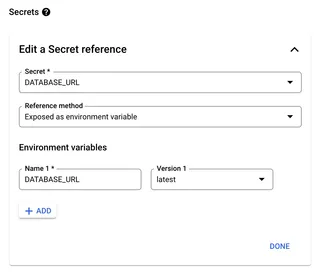
Reference your Secret Manager entry and expose it as an environment variable.
Finally, add your Cloud SQL Connection. If you created the Cloud SQL instance inside of the same Google project, you can choose via the dropdown, otherwise insert your connection string.
After finishing deployment, you will get a URL pointing to your installation as a subdomain to run.app.
What costs can I expect?
With the settings shown in the tutorial, I am currently processing about 80,000 page views per day, which is just about the limit. In order to be able to track more events, the number of Cloud Run instances would have to be scaled further; the Cloud SQL instance currently still seems to be able to cover all queries.
Currently I use Cloud Run for free (requests under the free tier) and Cloud SQL settles at 34 cents a day. The costs can vary depending on the location, but for me the total cost is about 10 € per month.
What are possible next steps in improving the installation?
The Umami installation is now complete, but can of course be further refined. My first steps in a new installation:
- Map a custom domain to your service. This way you don’t have to work with the unwieldy run.app domain, the custom domain is also valid for all shared dashboards and the API afterwards.
- Play with the environment variables. For example, by changing
COLLECT_API_ENDPOINT you can override AdBlocker (/collect is blocked quickly). - Replace the supplied tracking script with a simple fetch call. This way you can no longer use the automatic event tracking functions for elements, but the call is much more performant because you need much less Javascript. At the same time, you save traffic on your Cloud Run instance by not having to fetch external javascript from there.