Generate Social Media Preview Images
Automatically generate link previews for Twitter, Facebook or WhatsApp with NodeJS and Netlify. Present a custom thumbnail for each article!
You wrote a great blog entry. You share it on Twitter, WhatsApp or Facebook. And you want your audience to notice the blog entry and click.
Presentation is the key. First thing that catches the eye is not your well-formulated tweet, but the preview image.
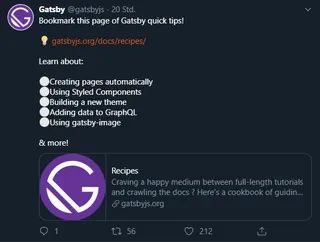
Without optimization, a tweet looks like this example from Gatsby:
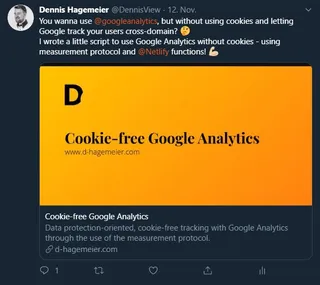
With a matching preview image, the Tweet is much more present:
A normal person would now open Photoshop, create a template file and save the image for the post. But it would be… boring. So I use NodeJS, Netlify and automate the whole thing :D
For this example I use the SSG Eleventy, but the functionality is not limited to a CMS. You can also generate and process a template file with WordPress.
Preparations
Generate HTML template
My first approach to creating thumbnails was to generate SVGs. A basic design in SVG, changing variables like title or URL dynamically, converting to PNG or JPG and - fiddlesticks. Because SVGs fail with multiline text. At the latest with longer headings this becomes a real problem.
Instead, an HTML template forms the basis. As already mentioned I use 11ty, for this I combine Nunjucks as template language. With the help of a pagination I then generate an additional thumbnail HTML for each regular HTML page.
I chose 1200x628 pixels as dimensions, so the thumbnail fits perfectly for Facebook, Twitter and WhatsApp. If you create thumbnails for other platforms, you can find the current dimensions at Sprout Social.
---
pagination:
data: collections.all
size: 1
alias: preview
permalink: "/assets/preview-images/{{ preview.data.title | pslug }}-{{ preview.data.language | url }}-preview.html"
eleventyExcludeFromCollections: true
---
<!doctype html>
<html>
<head>
<meta charset="utf-8">
<meta name="viewport" content="width=device-width, initial-scale=1.0">
<meta http-equiv="X-UA-Compatible" content="ie=edge">
<meta name="robots" content="noindex, nofollow" />
<style></style>
</head>
<body>
<div class="preview">
<svg xmlns="http://www.w3.org/2000/svg" width="80" height="91" viewBox="0 0 441 500" class="logo"><path d="M386.9 311.7c7.7-44 27-82.8 54-113.8C425.2 66 337.2 0 177.2 0H0v500h177.2c80.7 0 145.3-23.2 193.7-69.7 6.9-6.7 13.4-13.7 19.3-21-7.6-30.8-9.2-64-3.3-97.6zm-103.5 53c-27.8 29.3-66.1 43.9-114.9 43.9h-55.8V91.7h55.1c49.7 0 88.4 13.7 116 41C311.3 160 325 197.5 325 245.1c0 50.5-13.9 90.3-41.6 119.6z"></path></svg>
<h1>{{ preview.data.title }}</h1>
<h2>www.d-hagemeier.com</h2>
</div>
</body>
</html>
Example of a generated file
Exclude the crawlers from Google & Co. via “nofollow” so that your HTML preview templates do not appear in search engines.
Generate JSON with the required data
To pass the HTML templates to the image generator later, you next create a list of all HTML templates and their paths. Here is an excerpt from my JSON file:
[
  {
    "filename" : "import-tweets-from-twitter-api-in-11ty-en-preview",
    "path" : "https://www.d-hagemeier.com/assets/preview-images/import-tweets-from-twitter-api-in-11ty-en-preview.html"
  },{
    "filename" : "from-wordpress-to-jamstack-en-preview",
    "path" : "https://www.d-hagemeier.com/assets/preview-images/from-wordpress-to-jamstack-en-preview.html"
  },{
    "filename" : "5-tips-you-can-learn-in-las-vegas-for-your-business-en-preview",
    "path" : "https://www.d-hagemeier.com/assets/preview-images/5-tips-you-can-learn-in-las-vegas-for-your-business-en-preview.html"
  }
]
Create Google Storage
Netlify has a big disadvantage: With every deploy the old data is deleted. There are tricks with undocumented cache directories, but I didn’t want to rely on them.
Netlify would normaly delete and recreate all image data for each deploy. Depending on how many blog articles you write and how many images are generated, this generates a lot of work.
Instead, I decided to store the thumbnails in the Google Storage. Google Storage belongs to the Google Cloud Platform, offers the storage of data in so-called buckets and is free of charge for the first 12 months.
The creation of a suitable bucket is easy after login, I have attached my personal settings in brackets:
- “Create a bucket”
- Give a name (“previewimages”)
- Select storage location (“Multi-region”, “eu”)
- Select memory class (“Standard”)
- Set up access control (“detailed”)
- Advanced settings (all set to default)
Once the settings are done, your new bucket is waiting for you and you could already upload files manually.
To let our script store files in the bucket later, we need the corresponding Google Credentials. Just follow the official Google instructions and create a new service account. You will then receive a JSON file with your access keys. Save these keys well, they will only be generated once per service account!
Save the values CLOUD_PROJECT_ID, BUCKET_NAME, CLIENT_EMAIL and PRIVATE_KEY as .env variables, so they do not appear publicly.
Create previewimages.js
Packages and settings
Time for our actual script, in my case I called this previewimages.js. First you add the required NPM packages…
yarn add axios puppeteer @google-cloud/storage dotenv
…and register them in the script:
const axios = require('axios');
const puppeteer = require('puppeteer');
const { Storage } = require('@google-cloud/storage');
require('dotenv').config()
Next, add your variables.
If the error error:0906D06C:PEM routines:PEM_read_bio:no start line appears in Netlify later, my solution was to encode PRIVATEKEY to base64. In the local development environment I had no problems, it seems to be due to the multi-line format of the key.
const GOOGLE_CLOUD_PROJECT_ID = process.env.GOOGLE_CLOUD_PROJECT_ID;
const BUCKET_NAME = process.env.GOOGLE_BUCKET_NAME;
const CLIENTEMAIL = process.env.GOOGLE_CLIENT_EMAIL;
const PRIVATEKEY = Buffer.from(process.env.GOOGLE_PRIVATE_KEY, 'base64').toString();
const PRIVATEKEY = process.env.GOOGLE_PRIVATE_KEY;
const credentials = {
client_email : CLIENTEMAIL,
private_key : PRIVATEKEY
}
And last but not least you deposit the basic settings:
const settings = {
  source: "https://PATH-TO-YOUR-JSON-FILE.json",
  imgwidth: 1200,
  imgheight: 628
}
Axios data processing
First, you load your JSON file via Axios and pass the data to your processing function.
axios.get(settings.source)
  .then((response) => {
    setupGoogleStorage(response.data);
  })
  .catch((err) => {
    console.log('Error Axios: ', err)
  });
Google storage function
To prevent existing thumbnails from being recreated, first check which images are already stored in the bucket.
Create a new function setupGoogleStorage and authorize access to your bucket. Then we loop through the HTML template links and check via file.exists() if the image is available.
If the picture exists, only a short message appears in the console. If it has to be created, you pass the path, file and filename to the get function.
async function setupGoogleStorage(response) {

  try {
    const storage = new Storage({
      projectId: GOOGLE_CLOUD_PROJECT_ID,
      credentials: credentials
    });
    const bucket = storage.bucket(BUCKET_NAME);

    var i;
    for (i = 0; i < response.length; i++) {

      let filename = response[i].filename;
      let path = response[i].path;
      let file = bucket.file(filename + ".png");
      let exists = await file.exists().then(function(data) { return data[0]; });

      if(exists == true) {
        console.log("Image already exists: " + filename + ".png")
      } else {
        await get(path, file, filename)
      }

    }
  } catch (err) {
    console.log("Error setupGoogleStorage: ", err);
  }

}
Make screenshots
Now you actualy take the screenshots. In the get function we start a new puppeteer page and request the screenshot via the getscreen function.
async function get(path, file, filename) {
  browser = await puppeteer.launch({ headless: true });
  page = await browser.newPage();
  const buffer = await getscreen(path, filename);
  await uploadBuffer(file, buffer, filename)
  console.log("Uploaded: " + filename + ".png")
  await file.makePublic();
  browser.close();
}

async function getscreen(url, filename) {
  try {
    console.log("Getting: " + url);
    await page.setViewport({ width: settings.imgwidth, height: settings.imgheight });
    await page.goto(url, { waitUntil: 'networkidle0' });
    const buffer = await page.screenshot();
    console.log("Got: " + filename + ".png");
    return buffer;
  }
  catch (err) {
    console.log('Error getscreen:', err);
  }
}
With networkidle0 Puppeteer waits until there is no more network activity within 500ms. This delays the creation, but also ensures that all CSS files, fonts and images are loaded correctly.
Puppeteer don’t got variables for pagescreenshot in getscreen and saves the screenshot only as a buffer. Now pass this buffer to the Google Bucket:
async function uploadBuffer(file, buffer, filename) {
  return new Promise((resolve) => {
      file.save(buffer, { destination: filename }, () => {
          resolve();
      });
  })
}
Finished previewimages.js
const axios = require('axios');
const puppeteer = require('puppeteer');
const { Storage } = require('@google-cloud/storage');
const fs = require('fs');
require('dotenv').config()

const GOOGLE_CLOUD_PROJECT_ID = process.env.GOOGLE_CLOUD_PROJECT_ID;
const BUCKET_NAME = process.env.GOOGLE_BUCKET_NAME;
const CLIENTEMAIL = process.env.GOOGLE_CLIENT_EMAIL;
const PRIVATEKEY = Buffer.from(process.env.GOOGLE_PRIVATE_KEY, 'base64').toString();
const credentials = {
  client_email : CLIENTEMAIL,
  private_key : PRIVATEKEY
}

const settings = {
  source: "https://PATH-TO-YOUR-JSON-FILE.json",
  imgwidth: 1200,
  imgheight: 628
}

async function setupGoogleStorage(response) {

  try {
    const storage = new Storage({
      projectId: GOOGLE_CLOUD_PROJECT_ID,
      credentials: credentials
    });
    const bucket = storage.bucket(BUCKET_NAME);

    var i;
    for (i = 0; i < response.length; i++) {

      let filename = response[i].filename;
      let path = response[i].path;
      let file = bucket.file(filename + ".png");
      let exists = await file.exists().then(function(data) { return data[0]; });

      if(exists == true) {
        console.log("Image already exists: " + filename + ".png")
      } else {
        await get(path, file, filename)
      }

    }
  } catch (err) {
    console.log("Error setupGoogleStorage: ", err);
  }

}

async function get(path, file, filename) {
  browser = await puppeteer.launch({ headless: true });
  page = await browser.newPage();
  const buffer = await getscreen(path, filename);
  await uploadBuffer(file, buffer, filename)
  console.log("Uploaded: " + filename + ".png")
  await file.makePublic();
  browser.close();
}

async function getscreen(url, filename) {
  try {
    console.log("Getting: " + url);
    await page.setViewport({ width: settings.imgwidth, height: settings.imgheight });
    await page.goto(url, { waitUntil: 'networkidle0' });
    const buffer = await page.screenshot();
    console.log("Got: " + filename + ".png");
    return buffer;
  }
  catch (err) {
    console.log('Error getscreen:', err);
  }
}

async function uploadBuffer(file, buffer, filename) {
  return new Promise((resolve) => {
      file.save(buffer, { destination: filename }, () => {
          resolve();
      });
  })
}

axios.get(settings.source)
  .then((response) => {
    setupGoogleStorage(response.data);
  })
  .catch((err) => {
    console.log('Error Axios: ', err)
  });
You need the appropriate metatags to display social media preview images. There are the general Open-Graph-Tags and the Twitter-Tags, both belong to <head> of your website:
<meta property="og:image" content="https://URL-TO-YOUR-PREVIEW-IMAGE.png" />
<meta property="og:image:height" content="1200" />
<meta property="og:image:width" content="628" />
<meta property="og:image:alt" content="ALT TEXT FOR YOUR PREVIEW IMAGE" />

<meta name="twitter:image" content="https://URL-TO-YOUR-PREVIEW-IMAGE.png" />
<meta property="twitter:image:alt" content="ALT TEXT FOR YOUR PREVIEW IMAGE" />
The URL for your image is https://storage.cloud.google.com/YOUR_BUCKETNAME/IMAGENAME.png.
In order for your large image to appear on Twitter, you also need to add an additional specification…
<meta name="twitter:card" content="summary_large_image" />
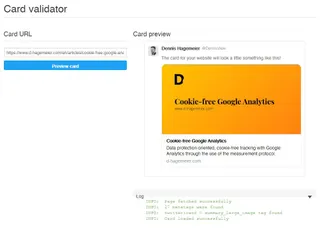
…and test the result in the Validator:
Deploy with new article
In order for each new article to receive a preview image directly, all you have to do is specify when the deploy should start. My own workflow for that:
- Website sends a webhook (“Outgoing webhook” in Netlify, under “Deploy notifications”) when a new deploy is launched
- “Build hook” of the preview page in Netlify triggers new deploy
If you don’t use Netlify, you can trigger the webhook differently. For example, if you’d like to trigger a deploy on every new article in WordPress, then add one of the automatically generated RSS feeds to IFTTT with the action “Webhook” and the Webhook target of your preview page.
That’s it, happy previewing! :D