Import Tweets from Twitter API in 11ty
Learn to retrieve your own tweets via API and dynamically display them in the Static Site Generator Eleventy.
Twitter is a wonderful platform to discover exciting articles, exchange ideas with people and pass on knowledge. So why not keep your website fresh with new tweets on the home page?
Possibility 1: Integrate the Twitter timeline via widget. Disadvantages: Little or no influence to design, an additional third-party script and the associated loss of page speed.
Possibility 2: Save the Twitter timeline directly in HTML via API in the build process. How this works with the Static Site Generator Eleventy is shown in this article.
Create API access data
In order to access the Twitter API, you first need your personal access data. Call the Twitter-Developer-Portal and select Create an app. Most of the fields shown here don’t even need to be filled in because the user of your website will never come into direct contact with the API.
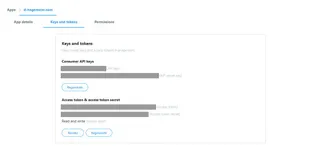
In my case the whole thing looks like this:

After clicking on the tab Keys and tokens you get your API-access data – you need all four, so save them!
I use dotenv to prevent my API credentials from appearing publicly on Github. So I add four entries to my .env file:
TWITTER_CONSUMER_KEY="YourAPIkey"
TWITTER_CONSUMER_SECRET="YourAPIsecretkey"
TWITTER_ACCESS_TOKEN_KEY="YourAccesstoken"
TWITTER_ACCESS_TOKEN_SECRET="YourAccesstokensecret"
Create data object in Eleventy
External data can be conveniently used in Eleventy. All you need to do is create a JavaScript file in the _data folder, which returns the desired data via return (see Documentation for details). First create a file named tweets.js in the data folder.
Then install the Twitter NodeJS package:
npm install twitter --save
My tweets.js file starts with the required libraries:
var Twitter = require('twitter');
require('dotenv').config()
Next, the Twitter NodeJS package needs our API credentials:
var client = new Twitter({
  consumer_key: process.env.TWITTER_CONSUMER_KEY,
  consumer_secret: process.env.TWITTER_CONSUMER_SECRET,
  access_token_key: process.env.TWITTER_ACCESS_TOKEN_KEY,
  access_token_secret: process.env.TWITTER_ACCESS_TOKEN_SECRET
});
Now we can query different data from the API. We are interested in our own tweets, so we need our user ID (you can also use the account name, but the ID remains the same even if you change the name).
We also add how many tweets we want to retrieve, I’ve chosen the 20 most recent tweets.
var params = {
  user_id: '550124146',
  count: 20
};
If you like, you can add several other options here, a complete overview can be found in the documentation on Twitter.
The only thing missing is the retrieval of the data and its export:
module.exports = async function() {
  return client.get('statuses/user_timeline', params)
    .catch((err) => {
      console.error(err);
    });
}
Altogether my tweets.js looks like this:
var Twitter = require('twitter');
require('dotenv').config()

var client = new Twitter({
  consumer_key: process.env.TWITTER_CONSUMER_KEY,
  consumer_secret: process.env.TWITTER_CONSUMER_SECRET,
  access_token_key: process.env.TWITTER_ACCESS_TOKEN_KEY,
  access_token_secret: process.env.TWITTER_ACCESS_TOKEN_SECRET
});
var params = {user_id: '550124146', count: 20};

module.exports = async function() {
  return client.get('statuses/user_timeline', params)
    .catch((err) => {
      console.error(err);
    });
}
11ty filter
Eleventy offers the possibility to define your own filters. I currently use two basic filters for the display of tweets.
Filter replies
By default, the API sends each tweet to the timeline, including the tweets you posted in response to other tweets. There are two ways to filter the responses:
1. Filter by API query
You add the value exclude_replies = true to your params variable. However, I decided not to do this because we cannot access the answers on any other page - they are not queried.
2. Filter by 11ty-Filter
With a global filter you can dynamically decide in the template where you want to include answers. The trick: Each reply starts with an @. The corresponding filter belongs in your .eleventy.js file:
eleventyConfig.addFilter("tweetExcludeAnswers", obj => {
  const result = obj.filter(el => el.text.charAt(0) !== "@");
  return result;
});
By default, the API appends the source URL of the tweet to each tweet text. Each of these URLs starts with Twitter’s short URL service - and I take advantage of that in this filter by filtering every URL that starts with https://t.co.
eleventyConfig.addFilter("tweetRemoveLink", obj => {
  const result = obj.replace(/https:\/\/t.co\/\S*/gm, "");
  return result;
});
If you want to display the date of your tweets, you won’t be able to avoid formatting. The Twitter API displays the date in the format Thu Apr 06 15:28:43 +0000 2017.
For formatting I use Moment.js. Moment.js allows you not only to change the format of the date, but also to influence the localization. Since I use the filter not only for tweets, but also for other data, I built it as flexible as possible, instead of setting it to the Twitter format.
eleventyConfig.addFilter("date", function(dateObj, fromformat , toformat, language = "en") {
  return moment(dateObj, fromformat).locale(language).format(toformat);
});
The filter can now be used as follows:
{{ item.created_at | date("ddd MMM D HH:mm:ss ZZ YYYY", "Do MMMM YYYY", language) }}
Prepare template
After we have formed a data object from the Twitter API into Eleventy, any value can be used dynamically in the template. I use Nunjucks for this.
First we set the tweetExcludeAnswers filter.
{% set twitter = tweets | tweetExcludeAnswers %}
Afterwards we can loop through the data. In this case I also limit the display to the five most recent tweets by using .slice(0, 5).
{%- for item in twitter.slice(0, 5) -%}
<!-- Show tweets -->
{%- endfor -%}
Each tweet can be assigned to one of three categories: A retweet, a quoted tweet (i.e. a retweet with an attached comment) or an original tweet. Each tweet item therefore has two attributes, retweeted and is_quote_status, which is provided with true or false. If both values are false, the tweet is an original tweet.
With this knowledge we can build the templates accordingly:
<!-- Retweets -->
{% if item.retweeted %}{% endif %}
<!-- Quote -->
{% if item.is_quote_status %}{% endif %}
<!-- Own tweets -->
{% if not item.is_quote_status and not item.retweeted %}{% endif %}
Since the tweets are only imported in the build process and embedded in the homepage HTML, the page has to be updated with a new tweet. If you use Netlify for hosting, you can save a lot of manual work with automatic deploys.
The trick: Webhooks and the link to IFTTT.
Create Build-Hook
First navigate to Settings > Build & deploy > Continuous Deployment > Build hooks in your Netlify account. After clicking on “Add build hook” only the name is missing (in my case “New tweet”) and the selection of the branch. Netlify then shows you a URL in the format https://api.netlify.com/build_hooks/BUILDID – save this one!
Trigger rebuild in IFTTT
In IFTTT you now create a new applet. Our trigger is the Twitter account: The task should always be executed as soon as a new tweet appears in your account.
The action is then “Make a web request”. Enter the build hook URL just received from Netlify under “URL”, “Method” is “POST” and for “Content Type” we use “application/x-www-form-urlencoded”.
This is what the finished task looks like for me:

That’s it, have fun with your tweets!